
Joomla Development
On Your Mac Computer Using MAMP
The following article was originally published July 14, 2009. Both MAMP and Joomla versions have both advanced since then but the basic fundamentals of using MAMP and Joomla remain the same to this day.

The simplest way to develop a Joomla! site on your local Mac OS X computer is by using MAMP. MAMP is short for Macintosh, Apache, MySQL, PHP. MAMP works just like an application. It is released under the GNU General Public License. You can download MAMP from Living-e AG. The download page can be found HERE.
Current MAMP versions require Mac OS X 10.4.x. If you're running Mac OS X 10.3.x you can download an earlier version of MAMP 1.4.1 (universal binary), for Intel and PowerPC.
Previously this site covered installing Joomla! 1.0x in the MAMP environment on your computer. Now that Joomla! 1.5 is available as a stable release you may want to install version 1.5 site on your Macintosh computer using MAMP. The two versions of Joomla! install methods are very similar but there are changes to Joomla! 1.5 that you can get familiar with here.
As of this writing MAMP is a Universal Binary version 1.7.1. The download is a 127 MB disk image. There is also a MAMP Pro version that you can read about HERE. This article will deal with the regular and free version of MAMP.
MAMP is installed on your computer in your 'Applications' Folder. In order to work properly the MAMP folder must be located in the Applications folder. You should also have at least 250 MB of free space on your hard drive.
Once MAMP is installed on your Mac you are now ready to install Joomla! 1.5. Get the latest full install of Joomla! from joomla.org. On the home page of joomla.org There is usually a banner with a button to download Joomla! When you click that download button you may be taken to a page which offers a couple of compressed install package options. The install packages come compressed as a .zip, .tar.gz, and .tar.bz2 compression. Your Macintosh OSX computer can deal with any of these compressions. Pick the one of your choosing and download that to your computer.
Let's say that you chose the .tar.gz package. Your download will likely be called 'Joomla_1.5.11-Stable-Full_Package.tar.gz'. Note that '1.5.11' will change as newer releases of Joomla! are made available. Uncompress this package on your hard drive by double clicking it. Your Mac OS X computer will expand the package into a folder with all the folders and files inside that you require for your install.
You can change that expanded folder name into something simpler like Joomla1511 for instance. That's what we'll use for this article. Move this entire Joomla1511 folder and its contents to the MAMP application and put it inside the folder called 'htdocs'. The path to the 'htdocs' folder will be /Applications/MAMP/htdocs.
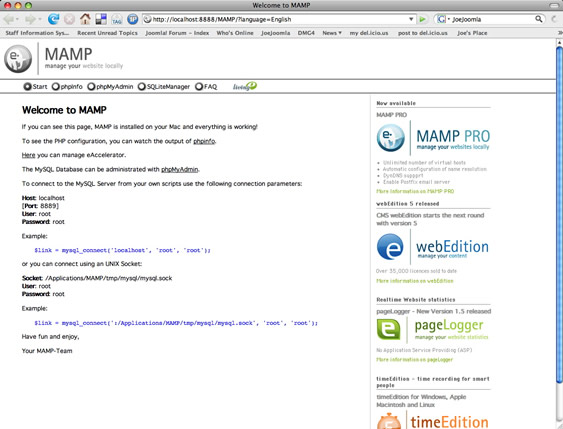
Now you are ready to install Joomla! 1.5. You can start MAMP, the application is inside the MAMP folder. It's simply called 'MAMP'. When MAMP starts up it should launch your web browser, if it isn't already running, and take you to a start up page with a URL of http://localhost:8888/MAMP/?language=English.
Before you navigate to the Joomla! web installation page you are going to need an MySQL database for Joomla!. This can be created using phpMyAdmin which is included with your MAMP install. You can get to phpMyAdmin from the startup page in MAMP. Get to the startup page either by clicking the button 'Open start page' on the MAMP startup interface screen or open by typing the following URL in your web browser:
http://localhost:8888/MAMP
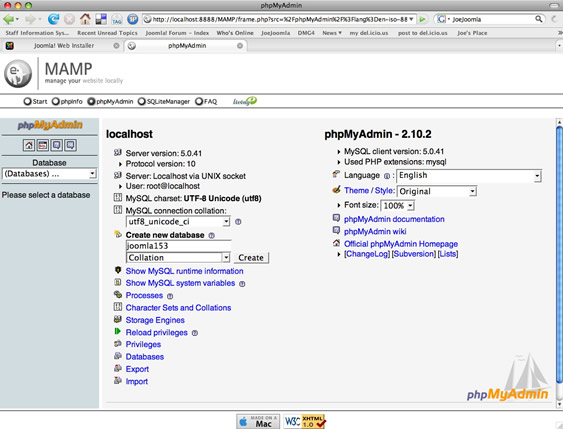
The page that appears has a navigation toolbar near the top of the page. You will find a button for phpMyAdmin on it. Click this link. When the page refreshes you will be on the phpMyAdmin screen. About half way down the page on you will see in bold text 'Create new database' and a field for you to type in the name you want to use for your database. For this article we are going to call the database 'joomla1511' (without the quotes). The default settings of this page should be fine to use. Once you type in the name of your database click the 'Create' button. When the screen refreshes you will see the results 'Database joomla1511 has been created.' There will be no tables for this database and you do not need to create any because your Joomla! install will create the necessary tables
You still need to create a username and a password for the database.
So lets make a username and password for our joomla1511 database. Click the home icon button in the left column of the phpMyAdmin screen. When the screen refreshes you should see your database name 'joomla1511' with (0) beside it. Turn your attention to the middle of the page near the bottom and look for 'Privileges'. Click the Privileges link.
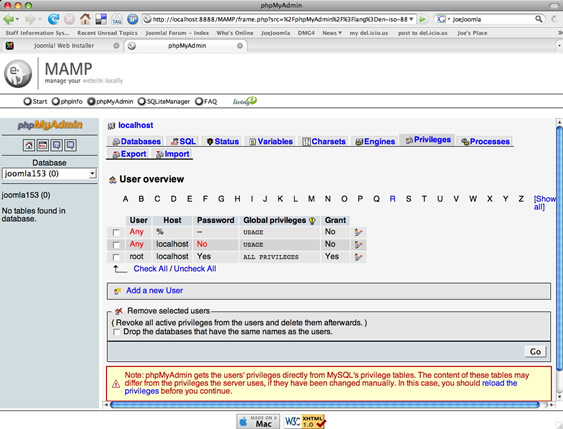
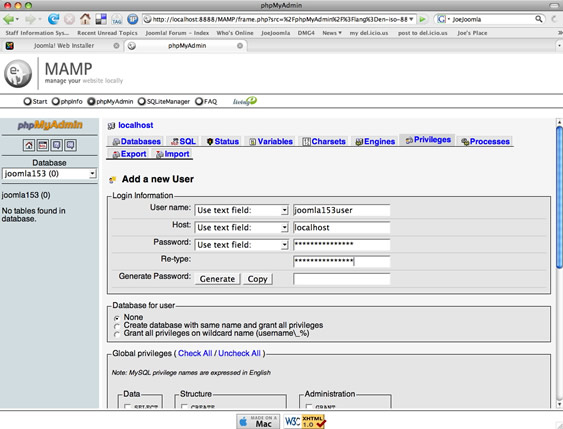
Here is the screen where you will fill in the Username, Host, and Password for your database. You could use 'root' for the username and password but I don't do this. By making a specific username and password for the database you establish good security habits.
- In the User name field type a username for your database
- In the 'Host' field type in 'localhost' (without the quotes)
- In the 'Password' field type a password for your database
- In the 'Re-type' field verify your password by typing it again exactly as the field above
A little further down the page is 'Global privileges' You can click the link 'Check All' and checkmarks will appear in the Data, Structure, and Administration boxes.
Once you have done this go to the bottom right corner of the screen and click the 'Go' button. After the screen refreshes you should see 'You have added a new user.' results.
Now you are ready to complete your Joomla! 1.5 installation.
To get to your Joomla! web installation in MAMP use the following URL:
http://localhost:8888/Joomla1511
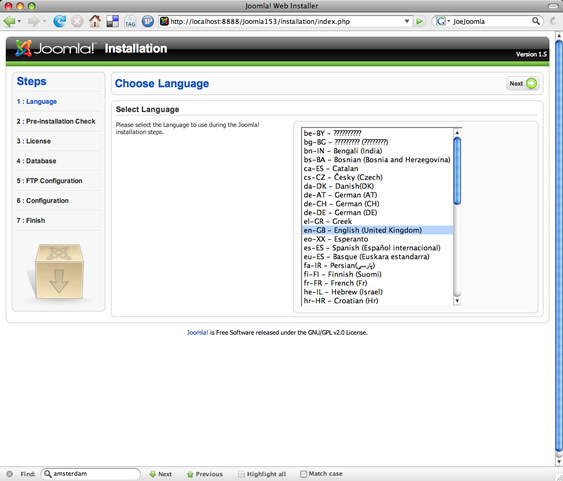
Note: if you changed the name of your Joomla! folder to something else, put it in the place of 'Joomla1511' in the above URL. This URL will take you to Step 1 of the web installation page for Joomla! 1.5. The first page is the language selector. Pick the language of your choice from the list on the right side of this page then click the 'Next' button on the top right of this page.
Step 2: Pre Installation Check
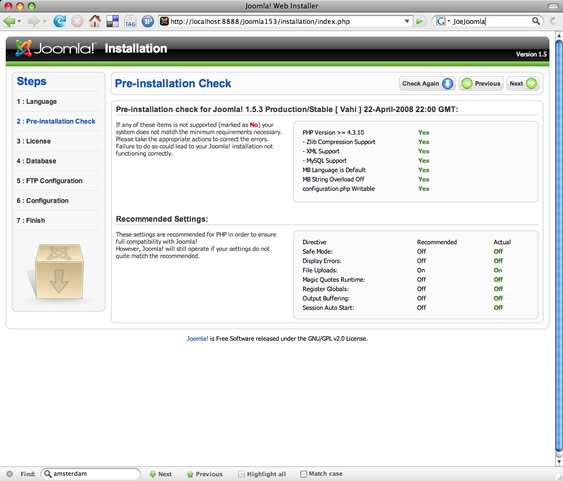
Next screen is Step 2: Pre-installation Check. You'll see a list on the right side of the page with information about the installation environment. You want to be seeing green and not red results to the right of the directives. If there are items marked with a red 'No' would need to correct them. Since this is a MAMP install there shouldn't be anything marked with a red 'No' so you are good to go. Click the 'Next' button on the top right of this screen.
Next page is Step 3: License. This is the Joomla! GNU GENERAL PUBLIC LICENSE. You should become familiar with the license. When you are done here click the 'Next' button on the top right of this page.
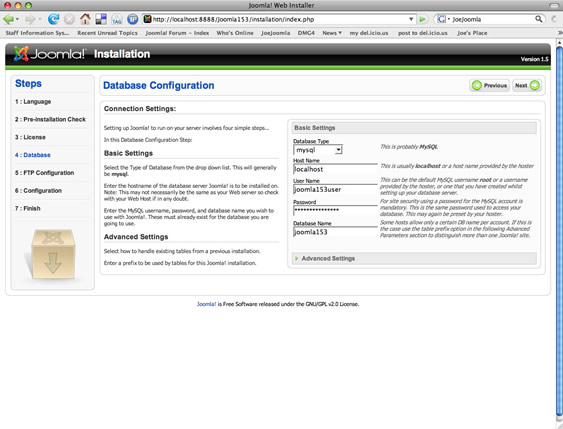
Next screen is Step 4: Database. The right side of the screen is where you need to fill in information about the database.
- By default the Database Type is mysql. We will leave it set to this
- Host Name - In this field type in 'localhost' (without the quotes)
- Username - Here you will type in the username that you created for the database earlier. I used 'joomla1511user' (without the quotes)
- Password - this is a password for the database username. Type in the password you used when creating the username and password in phpMyAdmin earlier
- Database Name - This is the name of your database. I used 'joomla1511' (without the quotes) when creating the database earlier in phpMyAdmin
Below the Basic Settings are Advanced Settings. In the Advanced Settings you can choose to Drop Existing Tables of an already set up MySQL database you might be using with a Joomla! install. You can also choose the option to Backup Old Tables. Since this is a new Joomla! install with a new database being created we there is no need to make any changes here. When you are done here click the 'Next' button on the top right of this page.
So if you have all the information filled in the fields you can click the 'next' button on the top right of this screen to take you to step 5.
If the information was filled out correctly on the previous screen you will be presented with Step 5: FTP Configuration. If instead you get a screen telling you there was an error, go back and complete the previous steps correctly.
The FTP basic Settings are set by default to 'No'. You can click the radio button and set it to 'Yes' if you like to Enable the FTP file system Layer. I use this in my MAMP environment to enable the use of an ftp program to update the Joomla! install when there is a new version of Joomla! released.
Since you set the Enable FTP file system Layer you will need to fill in the FTP User, FTP Password, and FTP Root Path fields.
- FTP User - The FTP User for your local computer should be the short name of your computer login name, or the name that appears beside the 'Home' icon in your finder window. If the name of your User account on your Mac is 'Joe Joomla' then your username will likely be 'joejoomla' (without the quotes). This is the name you will put in the FTP User field.
- FTP Password - In this field you would put your user login name for your computer. This is the name you type in the login screen when you have logged out of your computer.
- FTP Root Path - The root path to your Joomla! install inside MAMP will be:
/Applications/MAMP/htdocs/joomla1511
If you used a different named for your Joomla! install folder then use it instead of joomla1511.
You should click the 'Verify FTP Settings' button to ensure that the information you filled in is correct. You will get a confirmation message telling you the settings are valid if the information is right.
Under the Basic Settings is 'Advanced Settings'. In the fields you will see FTP Host with 127.0.0.1 filled in. You should change this to the IP address of your computer. You can find the IP address of your computer in the Network preferences pane of your System Preferences. The IP address of your computer may change depending on how your computer is set up. If you use DHCP to get an IP address when connecting to the Internet, then you will need to keep an eye on this and change it in the Joomla! admin Global Settings screen when necessary or you can simply leave the Basic Settings for FTP Configuration set to 'No' on this screen. You won't be able to use FTP layer if you do this but you can always enable it later, if needed, in the Joomla! Global Settings.
When you are done these steps click the 'Next' button on the top right corner of this screen. If all the information was filled correctly you will go to the next screen:
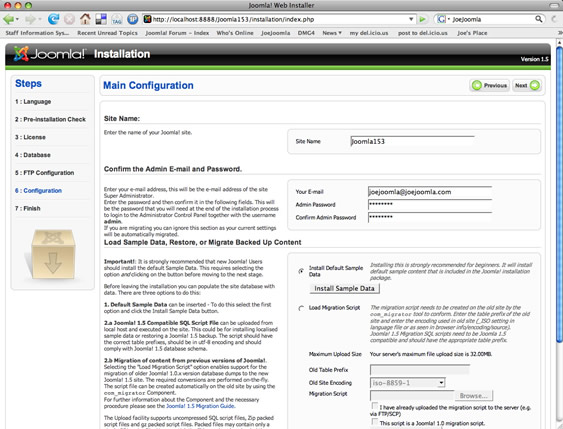
Step 6: Configuration - On the right side of the screen are fields to fill in.
- Site Name - Put whatever name you would like to use for your site in here
- Your E-mail - Put in your valid email address. Joomla! can send notification emails to you
- Admin Password - Put a password in here. This will be the password that you will need to login to the backend administration screens for Joomla!
- Confirm Admin Password - It must be typed in exactly as the Admin Password field above
Below these fields is a radio button to Install Default Sample Data with a 'Install Sample Data' button. It is a really good idea to let Joomla! to install sample content for your new install. It helps you to see how things work in Joomla!. You can unpublish or even delete this content later as you add your own content to your site.
We will leave the migration script area alone for this article since this is a new Joomla! install. When you are done on this screen click the 'Next' button on the top right side of the screen to get to:
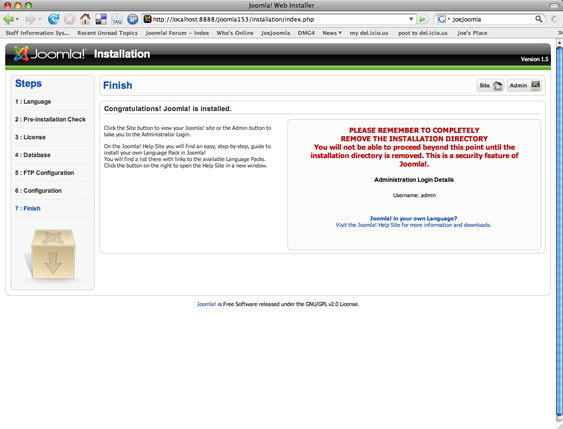
Step 7: Finish - Congratulations! Joomla! is Installed. Before you can click either the 'Site' or 'Admin' buttons on the right top corner of this screen you will need to visit the htdoc folder where your Joomla! folder is and go inside that folder and delete the following from the Joomla! folder:
- Folder - installation folder - delete the entire folder from the directory
- File - INSTALL.php - delete the file from the directory
Once those two items are removed from the Joomla! installation folder you can then visit your front page or your Joomla! admin area.